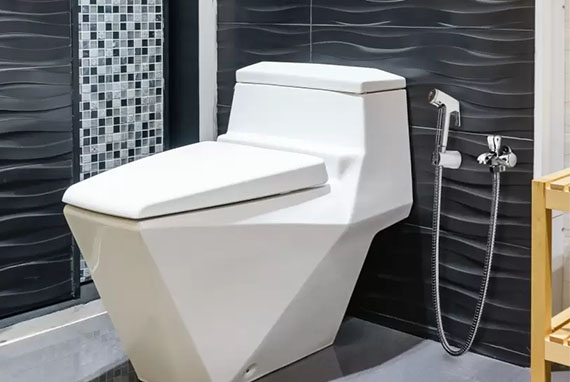
1/16/12

DIY Gold Leaf Wax Decals

Photobucket


By contributor Rachel Anne Jones

Today I'm excited to introduce to you an arty substance you probably haven't tried (or maybe even haven't heard of) before: encaustic wax. It is one of the earliest forms of paint, and yet we mostly see it nowadays solely in modern and abstract gallery art. Despite it's scary name, it is very quick and easy to use. This project makes a beautiful, professional, and expensive-looking decal that is about 1/16th inch thick that will only take about 10-15 minutes to do once your wax is heated up. Most scrapbookers already have most of the ingredients needed for this tutorial, but the encaustic themselves won't be found at your average scrapbook/craft store.

It's readily available, but you might need to visit your local art supply store to find encuastics (or go online to places like dickblick.com). I personally like the Enkaustikos brand "Hot Cakes", since it comes in convenient tubs that are easy to heat with a candle-warmer. For art supplies, they aren't expensive--a small tub of clear 1.5 oz (which is more than plenty for the average crafter) is about 6 dollars, and when you buy it in the bigger tubs, the cost per ounce goes down a lot - pigment tubs are more depending on the color. Yet, why is it so much more than normal beeswax?

Encaustics aren't just plain candle-wax. They're a mix of pigment, damar resin, and beeswax. If you get clear medium like I do pigment is left out. Encaustics allow wax to paint with a brush; allows them to attach to paint and porous boards; and be painted upon with oil mediums (and acrylic although it's less permanent). The resin gives it a hard coating and a beautiful glaze when fully dried.

I got the clear wax medium for this project, but you can use any color of wax, since it comes in as many colors as paint. The difference between encaustics and oil paint is just two ingredients. I get mine clear since I can just paint on top of it with other paints.

Materials

-a tub or block of encaustics wax medium (preferably a tub. I've never used them in the brick form so I can't tell you how those work, but cleanup for encaustics in a tub is as simple as turning off the heat and putting the lid back on.)
-a candle warmer or a portable pancake griddle you will never eat food on again that you can set to the lowest setting.
-a hair dryer
-a panel to paint on (or anything else, let it be a jewelry box, a decal for the wall, or a cabinet, a frame, a cover of a fancy book, or etc, etc.)
-cheap-o throw-away brush
-fluffy brush for applying gold/metallic leaf
-gold/metallic leaf (I use leaf, but you can use a sheet or a powder or even a metallic paint if you wanted)
-plastic stencil

Directions

Prep work is pretty easy: The board I used was just a slab of masonite. I prefer painting on masonite because it's cheap, doesn't warp, and has no grain. I used white gesso to prime the base, but you can also glue on a sheet of fancy paper (or a map or an old dictionary page) and then seal it with a clear medium like hodge-podge or acrylic.

Then, heat the tub on the candle warmer. It could take several hours if you have a huge tub.

Photobucket


1. Using the cheap brush, paint the wax over the stencil onto your board. This was my Christmas present stencil I bought for myself - worth it. It'll be quite thick, and you'll get some really juicy paint strokes. As you take off the stencil, you might want to hit it a little with the hair dryer to make sure you get as much wax as possible on the board and not stuck to the stencil. It won't be perfect, but that's part of the charm.

2. As the wax is sticky, place some foil on the wax and press it down with your finger. Then, take your fluffy brush and lightly brush away excess foil onto other waxy parts and also off of the work area. (I use a body-glitter brush that came with my J Lo glitter in High School. Yeah, I wore that for like 4 days). I like to have a piece of paper near my work to sweep my excess foil onto so I can collect it when I'm done.

3. Reheat with the hair dryer when necessary to make the wax sticky again--but remember it doesn't need that much heat--just a second or two--we don't want our wax decal to loose it's sharp shape and paint strokes. I felt like only covering half of my decal, because I like the open clear spots so's to keep people guessing how the hell I did it, but you can cover it entirely in gold if you want.

4. You're completely done! Now you can display it and brag about it. Pretend that you painstakingly carved it and molded it and soldered gold to it.

Photobucket

After they're cool, wax decals can be pretty hearty, but don't leave it out of the sun and don't let the kids lick them. Don't clean them except for lightly dusting them off with a damp rag maybe.

To clean your stencil, heat the wax with the hairdryer and when it's soft, gently scrape it off with a palate knife to put it back in your tub. Don't bother to clean your cheap-o brush--there are ways but, eh--throw it out.


Pin It
Follow Me on Pinterest

1 comment:

  1. I really want to try this.
    Do you know if pure beeswax without damar will work?
    Your DIY was easy to follow and looks great!

    ReplyDelete

All comments are moderated and will appear after approval. Please note that I have two little ones - and am a little slow to respond sometimes - but I read them ALL and appreciate your comments very much. Thanks!

Related Posts Plugin for WordPress, Blogger...